My first Hackintosh
Building an Intel Desktop PC for Mac OS X
Post published on January 31, 2015.Recently I celebrated my 21st birthday. After using my MacBook Pro 13" 2010 as my only computer for more than four years, I could no longer stand its non-existent performance. So my present for myself is this quite performant Hackintosh build... :)
Hardware
I pretty much followed the CustoMac Pro section of tonymacx86 Buyer's Guide January 2015, with some slight modifications. I didn't buy a Thunderbolt compatible main board, simply because I don't have any Thunderbolt devices and do not plan on getting one, now that I have USB 3. It ended up being a LGA1150 main board because of compatibility issues between the newest Intel CPU generation and Mac OS X.
- Main board: Gigabyte GA-Z97X-UD5H
- CPU: Intel Core i7 4790k
- Graphics: Gigabyte GeForce GTX 760, 4GB, WindForce 3x
- RAM: Crucial Ballistix Tactical, 2x4GB, DDR3-1866, CL9-9-9-27
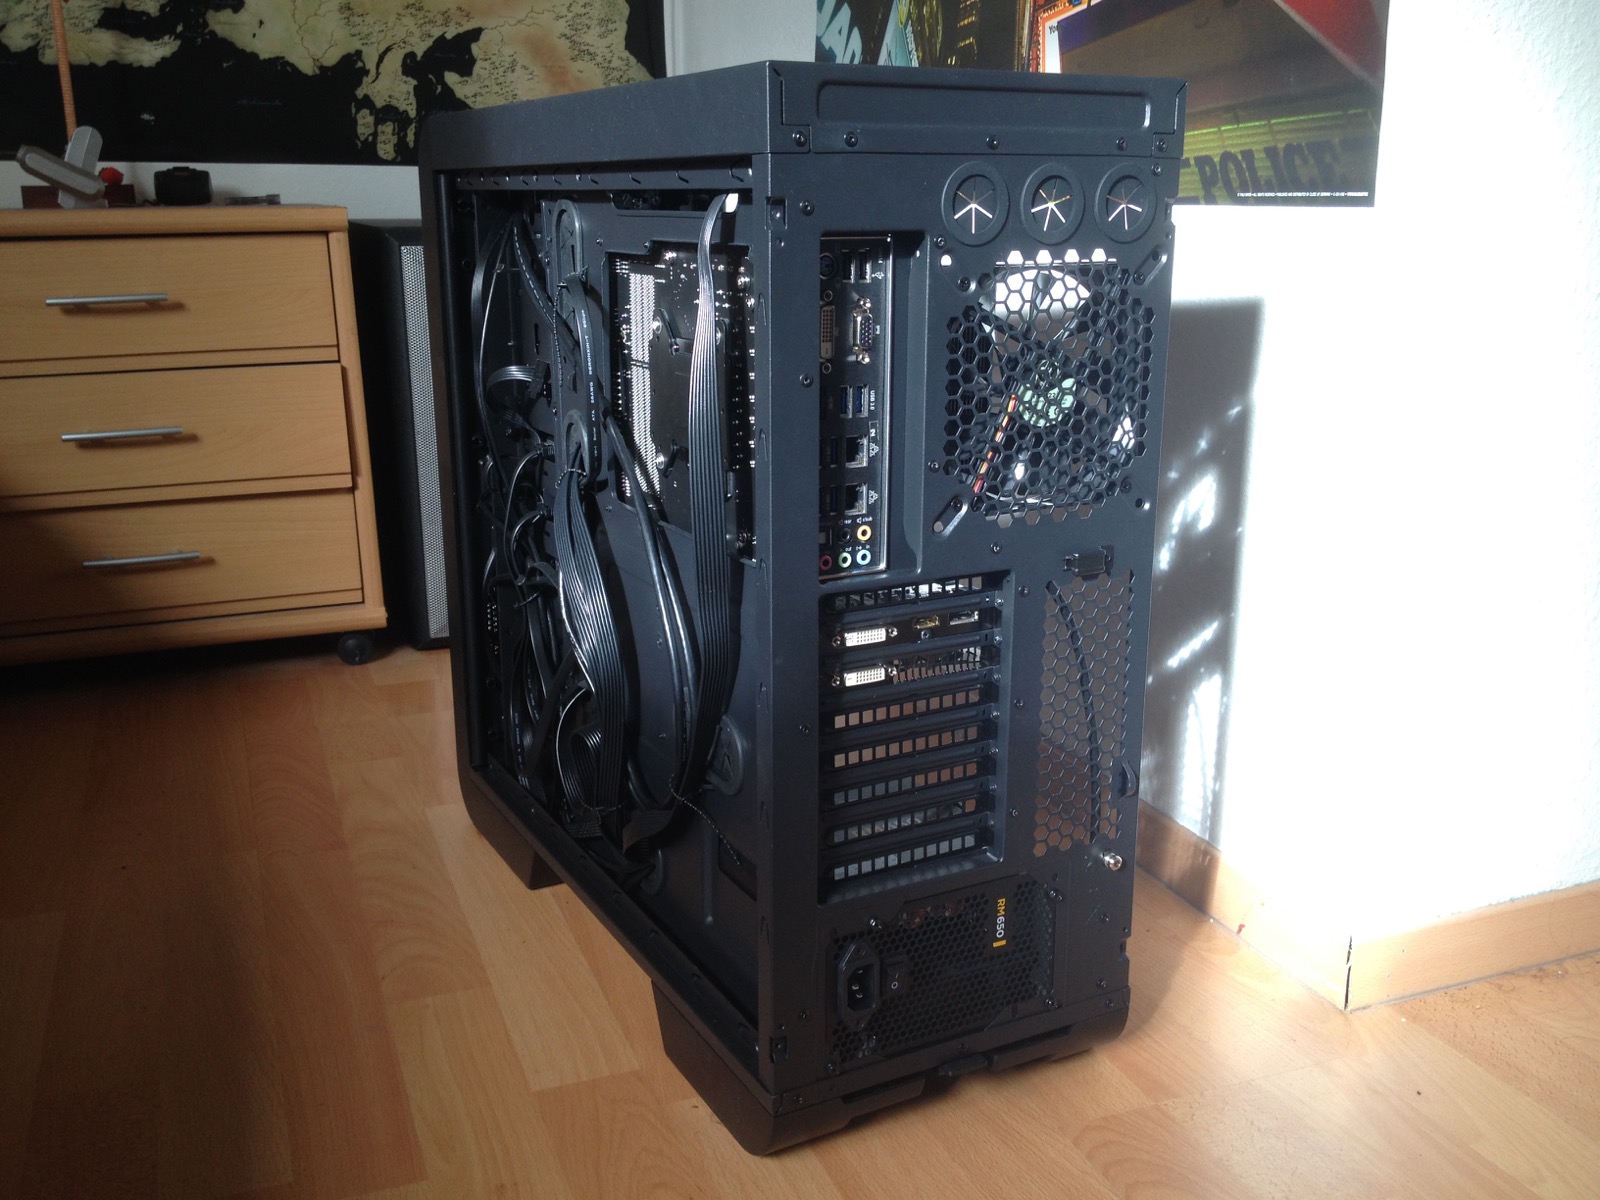
- PSU: Corsair RM 650
- SSD: Samsung 850 Pro 256GB
- HDD: Seagate Barracuda 3TB 7200rpm
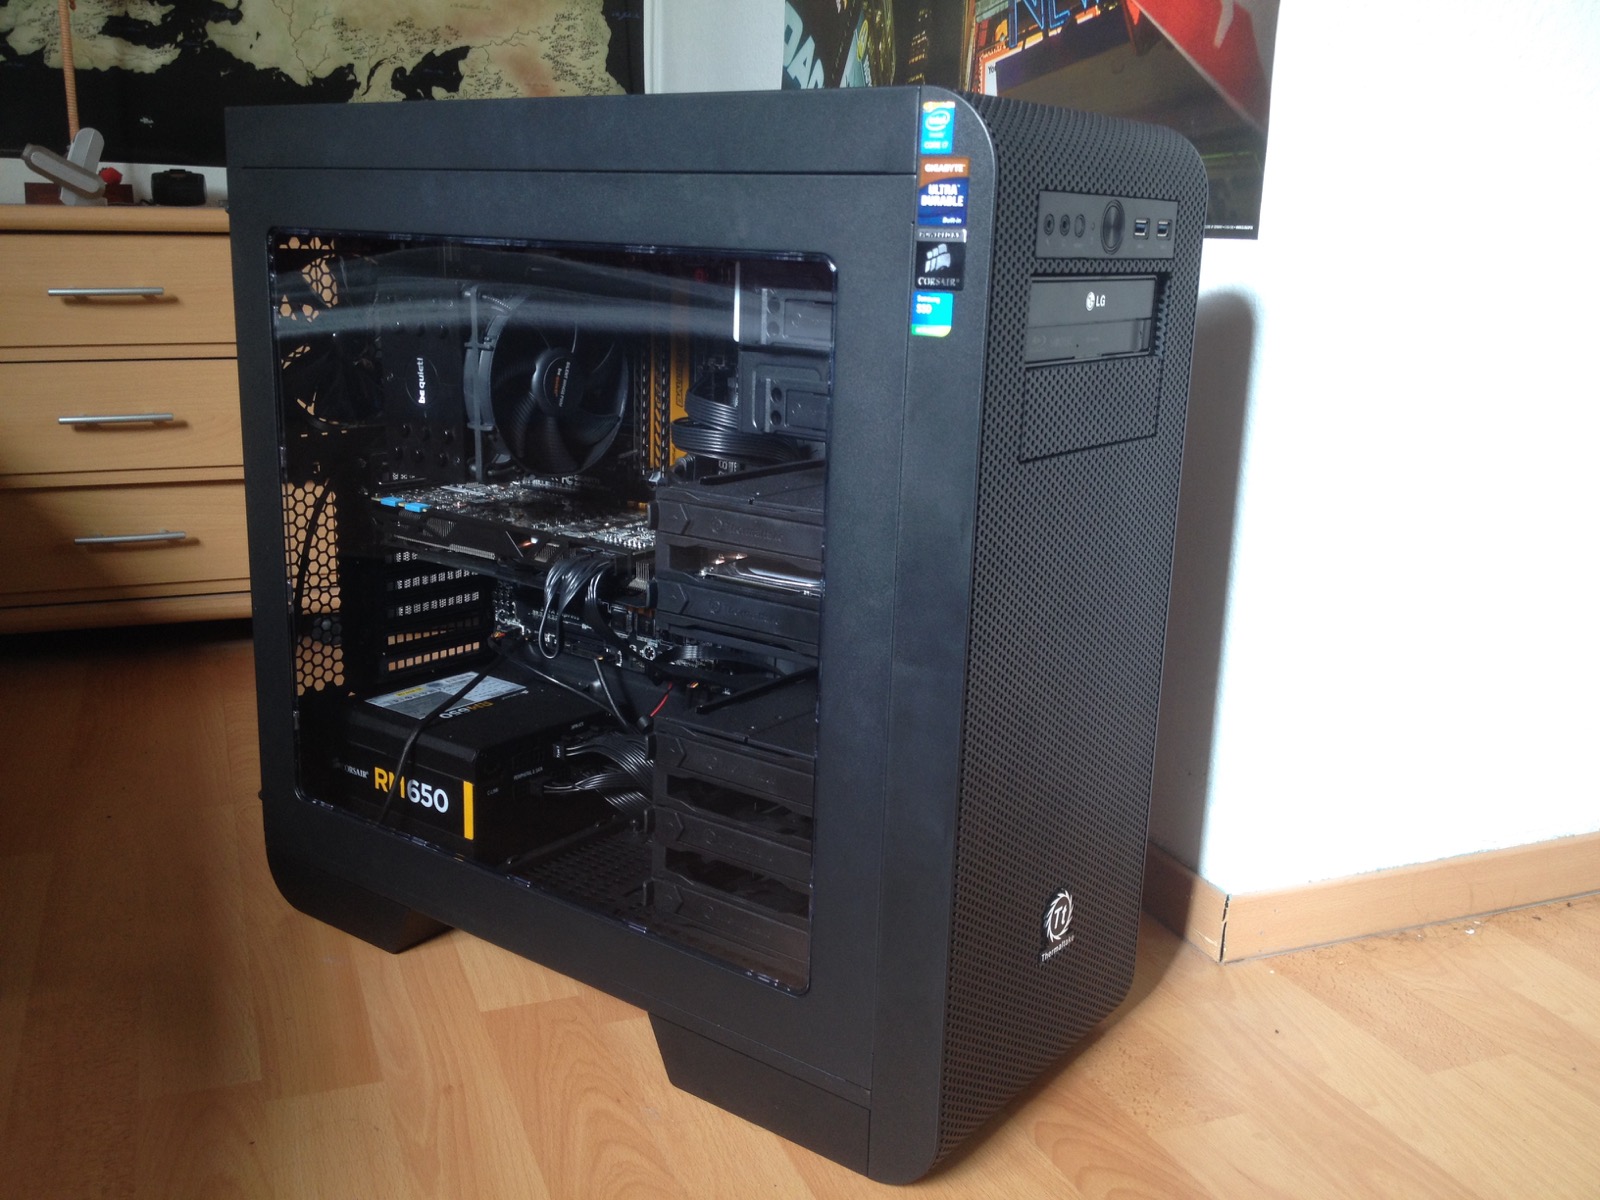
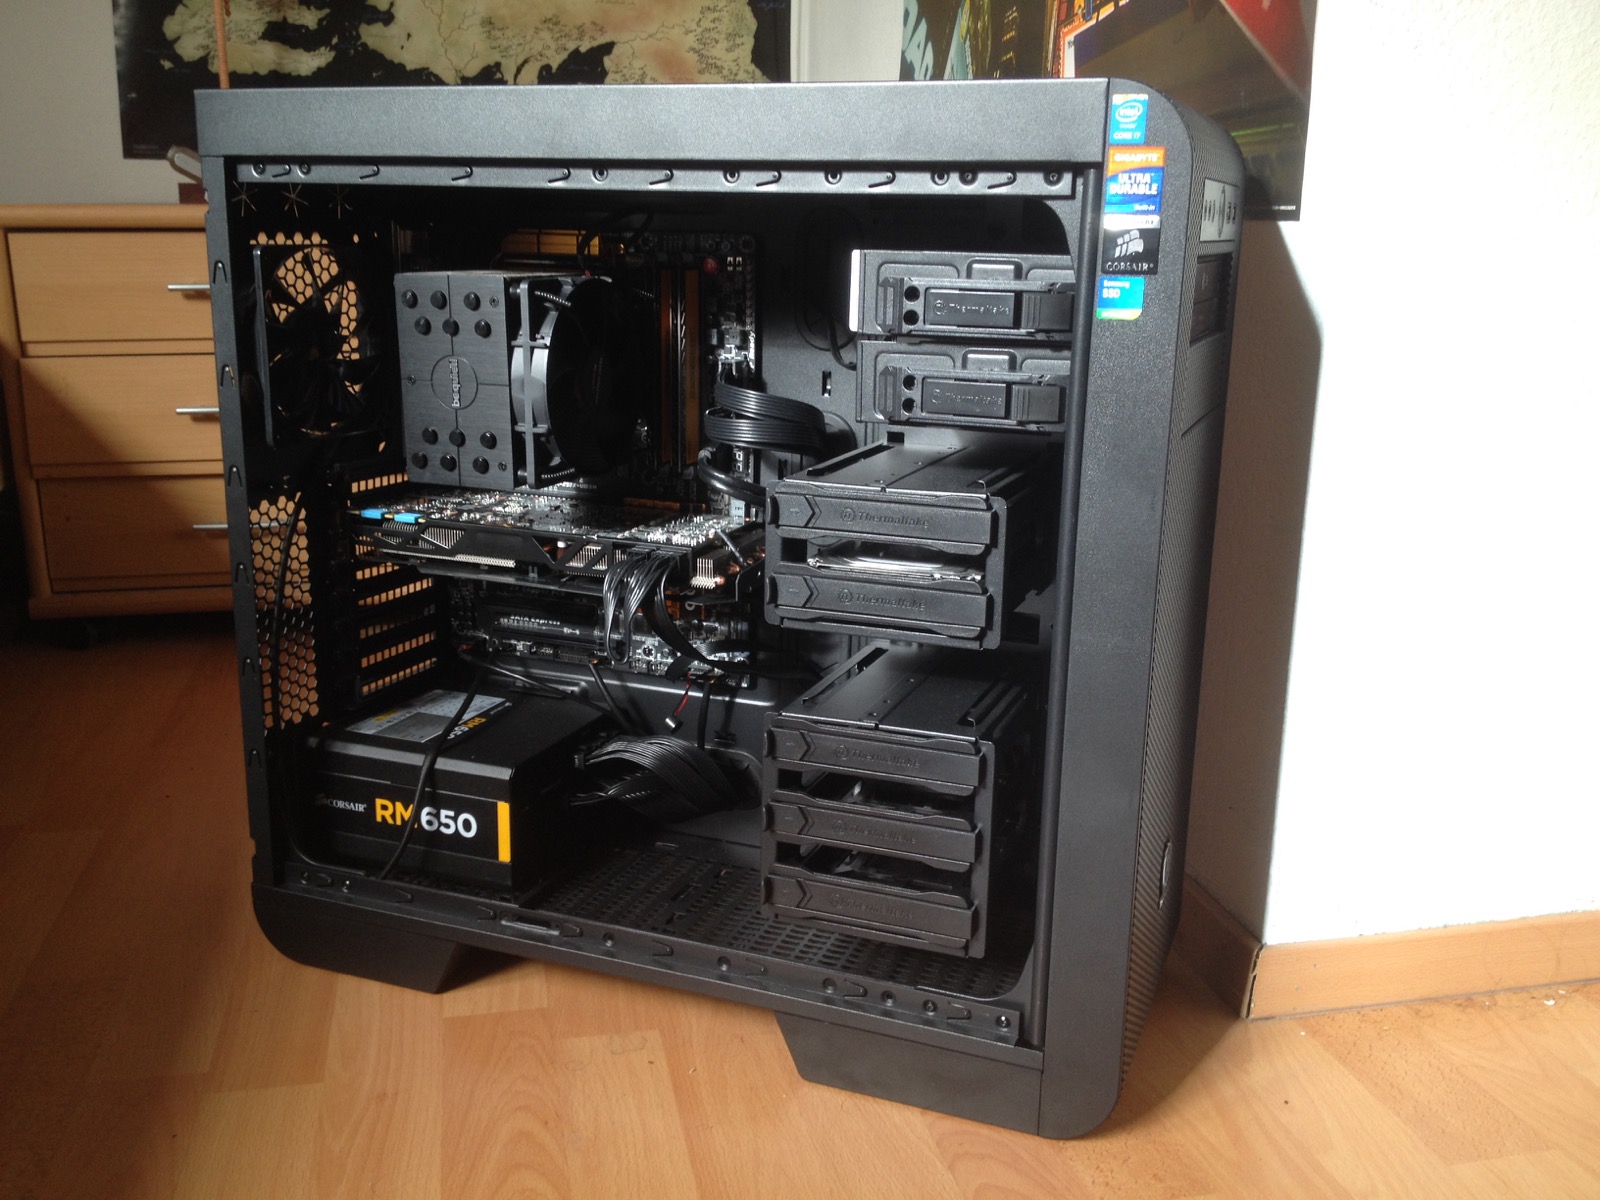
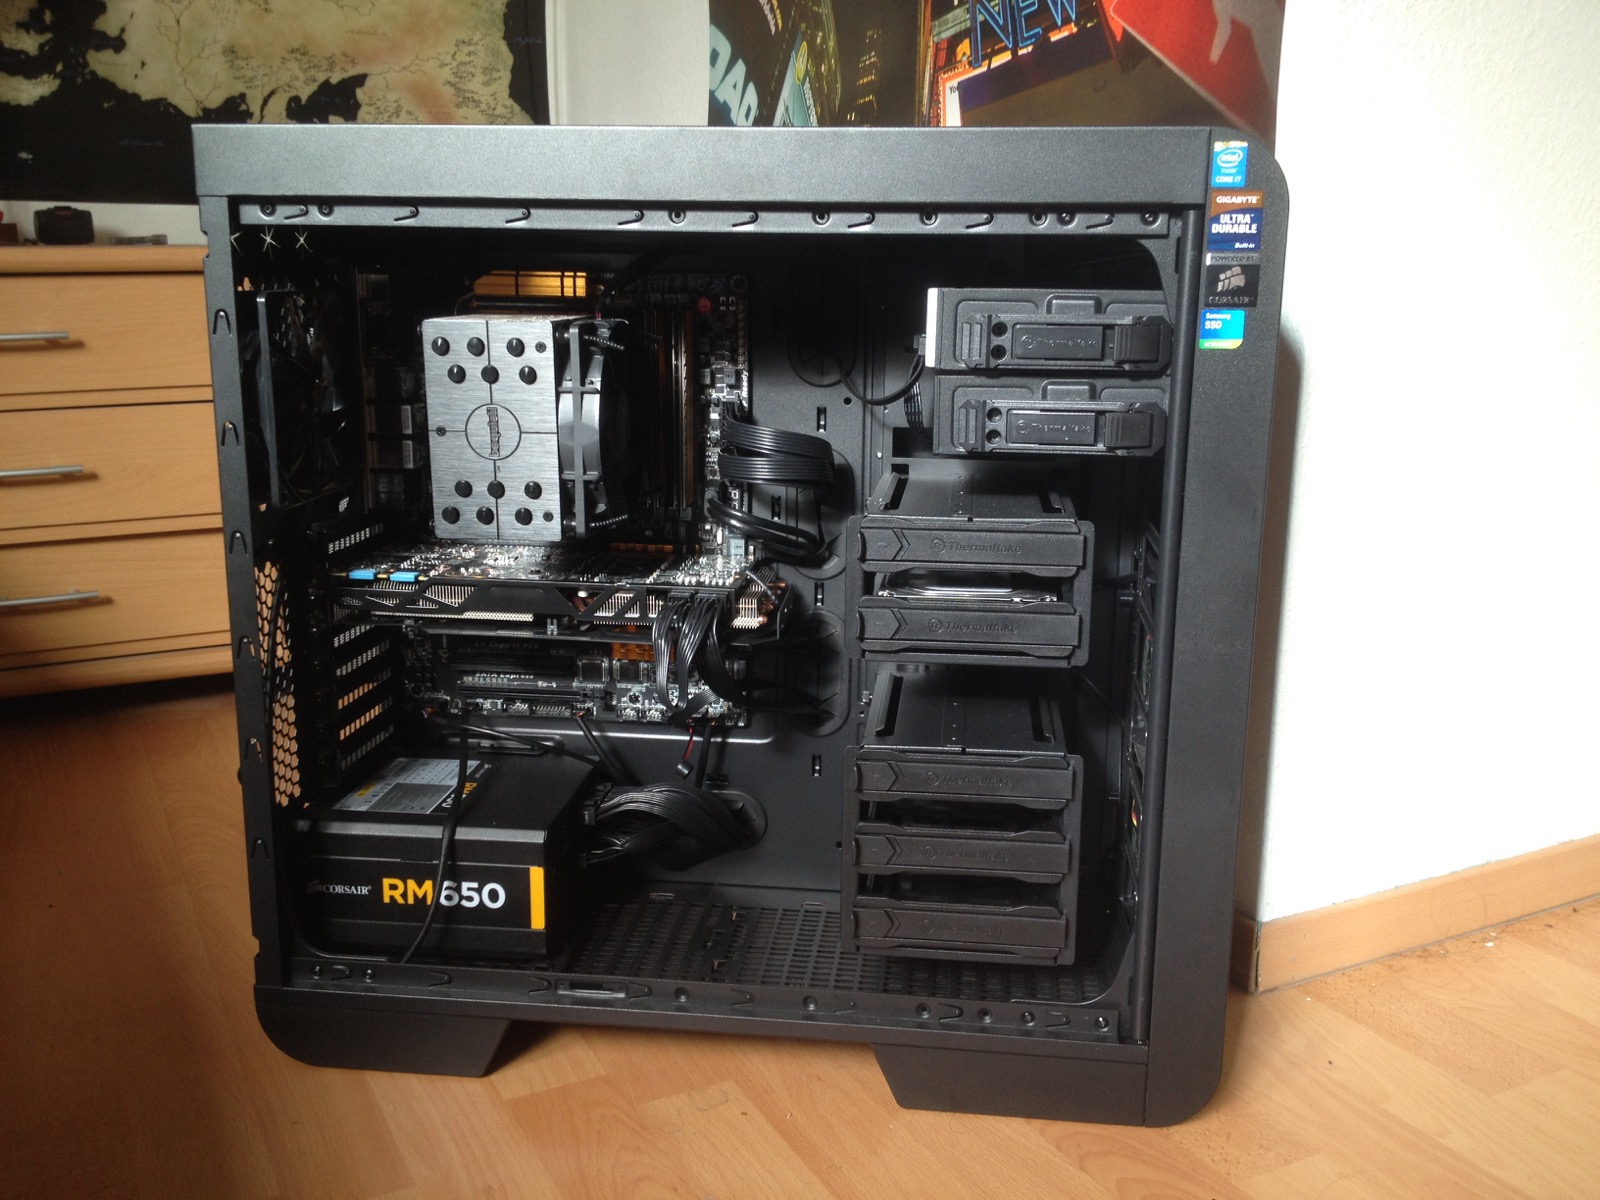
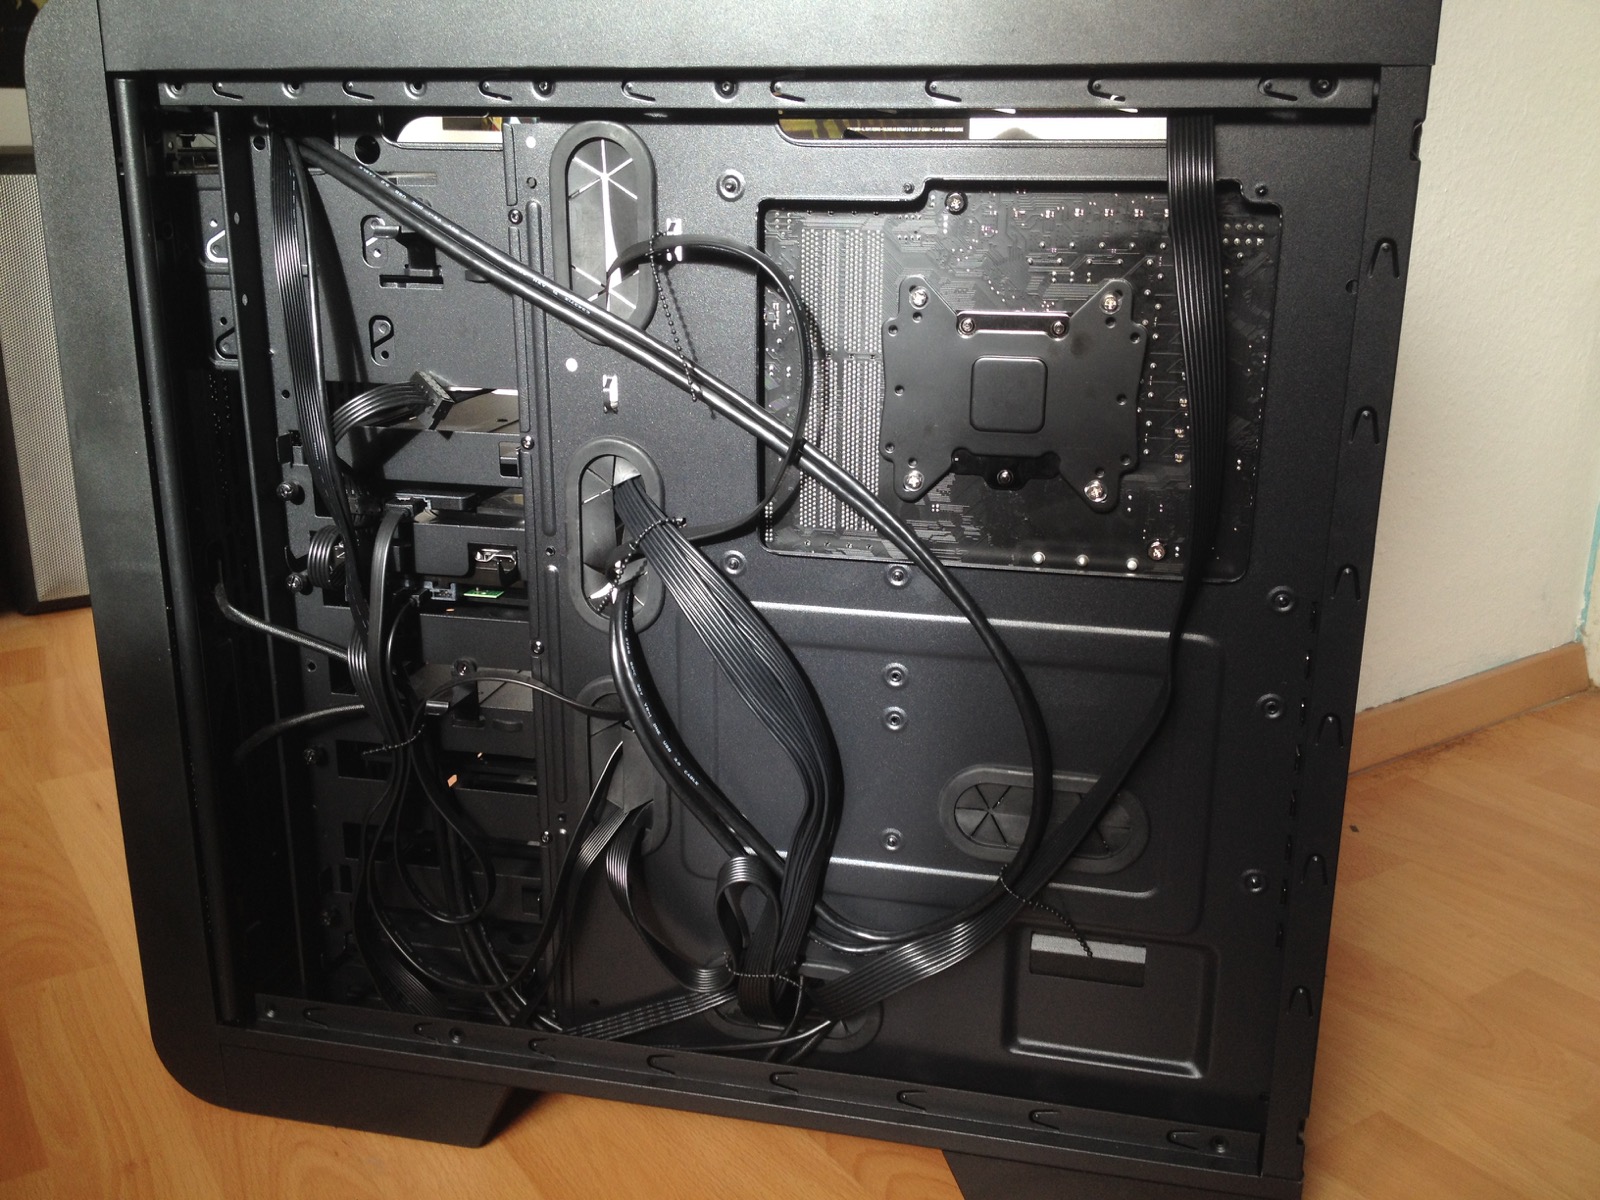
- Case: Thermaltake Core V51
- Disc Drive: LG BH16NS40 Blu-Ray Burner
- CPU Cooler: be quiet! Dark Rock Advanced C1
Putting it together
Combining all the parts was not really difficult. The cooler seems to be mountable in all four directions and does not obstruct any RAM slots. I especially liked this cases quick-install-mechanism for the DVD drive, which does not need any screws. 3.5" HDDs also don't need screws and are vibration dampened, although I'm not sure how functional this really is.
The included case fans are three non-PWM 3pin 120mm fans. They're not exactly quiet, but also not too loud. The loudest part currently seems to be the HDD, besides the Intel boxed cooler, which was really bad.
UEFI/BIOS settings
The first thing you should do after updating the UEFI firmware, or when turning it on for the first time, is loading the optimized default settings.
This is the first non-Apple computer I own that has UEFI, so I was quite excited. Unfortunately, the graphical interface seems to be more of a gimmick.
Most importantly, there are three modes the UEFI can be in. There's the text mode, which looks like a classic BIOS (but with mouse support). Some settings can only be changed in this mode. And there are two different GUIs, an "easy" version for inexperienced users, and the "full" GUI. Press F2 to switch between the three modes.
First, you need to turn of VT-d. This is an Intel virtualization technology that is not supported by Mac OS X and causes problems when turned on. Thats okay, because both OS X and the CPU support VT-x, the "successor" of VT-d.
Then set the XHCI Mode from "Smart Auto" to "Auto".
Also make sure all SATA controllers and ports are set to AHCI mode.
I also disabled the Intel processor graphics, just to make sure to never run into problems from having two GPUs.
And I disabled the unused network controller. This main board has two NICs, a Killer (1) and an Intel (2). In the UEFI, the Killer is called "OnBoard LAN Controller" and the Intel is called "PCH LAN Controller".
Other things I've set are: Windows 8 Features to Other OS, Boot Mode Selection to UEFI only, XHCI Hand-off to Enabled, EHCI Hand-off to Enabled, System Fan Speed Controls to Silent, Extreme Memory Profile (X.M.P.) to Profile1 (for my RAM).
Installing Mac OS X Yosemite
Basically, I followed this Guide for Yosemite and Clover, modified for my build, as well as this more specific build report. I'll try and explain this process here.
To boot Mac OS X on a non-Apple computer generally requires a bootloader of some sort. The two most common ones in use today are Chameleon and Clover. Which one to use seems to be some kind of a holy war, but I've settled with Clover (which seems to be more bleeding-edge).
As I already have a real Mac, getting the Yosemite installation media was no problem. I just formatted an 8GB USB Stick as HFS+ Journaled with a GUID partition table and copied the Yosemite installer:
sudo /Applications/Install\ OS\ X\ Yosemite.app/Contents/Resources/createinstallmedia --volume /Volumes/USB --applicationpath /Applications/Install\ OS\ X\ Yosemite.app --no interaction
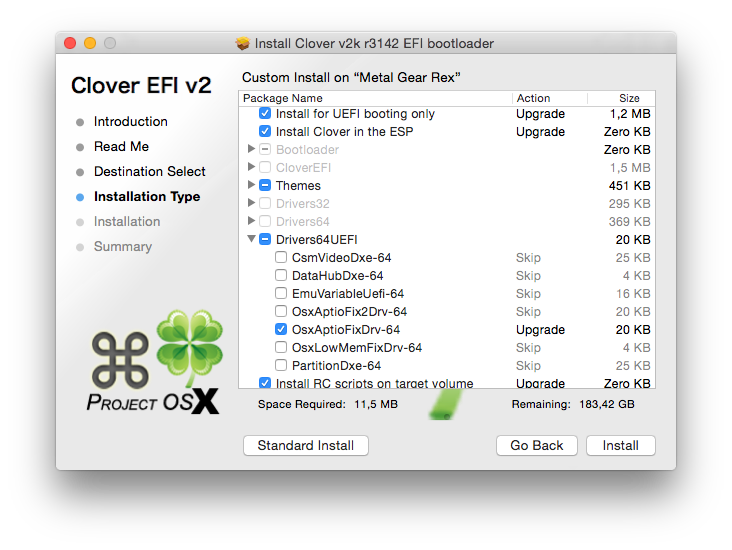
After this finished, I just had to run the latest Clover installer, pointing it to the USB Stick as install location. I've installed the Bootloader into the MBR, as suggested by the guide, but UEFI booting should probably work, too. I also selected the drivers suggested by the guide, but later found out that only the OsxAptioFixDrv-64 is required.
I'm not sure why, but it seems to be common in the Hackintosh community to delete the VBoxHfs-64.efi driver from the EFI partition just filled by the installer, and replace it by the (proprietary) HFSPlus.efi. Maybe it is (or was) more stable.
I also added the AppleIntelE1000e.kext driver for networking support.
The other necessary kernel extensions are HWSensors (GitHub), mainly FakeSMC.kext to emulate hardware only found in real Apple computers. But I see no reason not to install the other HWSensors extensions and the App, as it allows you to see the computers temperatures and other important data.
Many main boards require further work, namely a patched DSDT.aml file. Luckily, this is not needed for Gigabyte main boards. However, I added this SSDT.aml from the linked build report.
The last thing required is the config.plist for Clover. I've used parts from the config.plist from the linked build report (mainly the TRIM patch), as well as the Haswell DMG from Rampage Dev.
Here are some sections of my config.plist:
...

<key>Boot</key>
<dict>
    <key>Arguments</key>
    <string>-v kext-dev-mode=1</string>
    ...
    <key>XMPDetection</key>
    <true/>
</dict>
<key>Devices</key>
<dict>
    <key>Audio</key>
    <dict>
        <key>Inject</key>
        <string>1</string>
    </dict>

    ...

    <key>USB</key>
    <dict>
        <key>Inject</key>
        <false/>
    </dict>
</dict>

...

<key>Graphics</key>
<dict>
    <key>Inject</key>
    <dict>
        <key>ATI</key>
        <false/>
        <key>Intel</key>
        <false/>
        <key>NVidia</key>
        <false/>
    </dict>
</dict>
<key>KernelAndKextPatches</key>
<dict>
    <key>AppleRTC</key>
    <true/>

    ...

</dict>

...
XMPDetection is turned on because of my specific RAM configuration. I had to disable NVidia injection to get a proper VRAM reading in OS X (if it is true, the OS said 0MB VRAM). AppleRTC has to be set to true or some BIOS settings will be lost on every boot.
Now the USB stick is ready to be booted from. Choose the USB stick from the BIOS boot medium selection screen.
In the Clover screen, choose to boot the OS X installer. In the installer, open Disk Utility and format your SSD/HDD as HFS+ Journaled with an GUID partition table.
Now just let the installer do its usual thing. On the first restart, boot from USB again and choose the installer in Clover (as before). After the second restart, boot from USB again and now choose the new OS X installation.
After the last installation step finishes, it should jump right to the setup and then the desktop. Now don't reboot before installing the bootloader to the SSD/HDD. The first step for this is reformatting the EFI partition as FAT32 (assuming disk0 is the boot disk):
sudo newfs_msdos -v EFI -F 32 /dev/rdisk0s1
Get the Clover installer again, and install for UEFI booting only, with the OsxAptioFixDrv-64 and Install RC scripts on target volume, on your SSD/HDD. Then do the same steps as before, now with your main EFI partition, namely installing FakeSMC, the HWSensors, the Ethernet driver and HFSPlus.efi, as well as the config.plist.
Patching the audio driver
Mac OS X does not contain any drivers for the audio chipset used on my motherboard (Realtek ALC 1150), so no sound output was to be expected.
Fortunately, GitHub User toleda published a Shell script that can be used to patch the Apple Audio driver, AppleHDA.kext. Simply download the script audio_cloverALC-100.sh and run it. It will confirm the audio hardware was detected right, ask if you want to enable Intel HD4600 HDMI sound output (I have not tested this!) and then patch the Apple kext. Just reboot, and the Sound hardware will be detected correctly.
The patched kext will be replaced after every system update, so you have to do this again sometimes.
Now you may notice that the sound output will no longer work after waking the Hackintosh from sleep. That's because OS X is disabling amplifiers when entering sleep, but does not enable them again. But again there is an open-source solution to this, called CodecCommander.
Just clone the repository and build it using xcodebuild. Then edit the Info.plist in the newly built kext by changing the Codec Address Number to 2 (this is all described in great detail in the CodecCommander Read me). You can download my modified Info.plist here (9 KiB).
Put the CodecCommander kext into /System/Library/Extensions, it can not be injected using Clover. Make sure you have enabled the "kext-dev-mode=1" kernel boot flag in Clovers Info.plist for this to work.
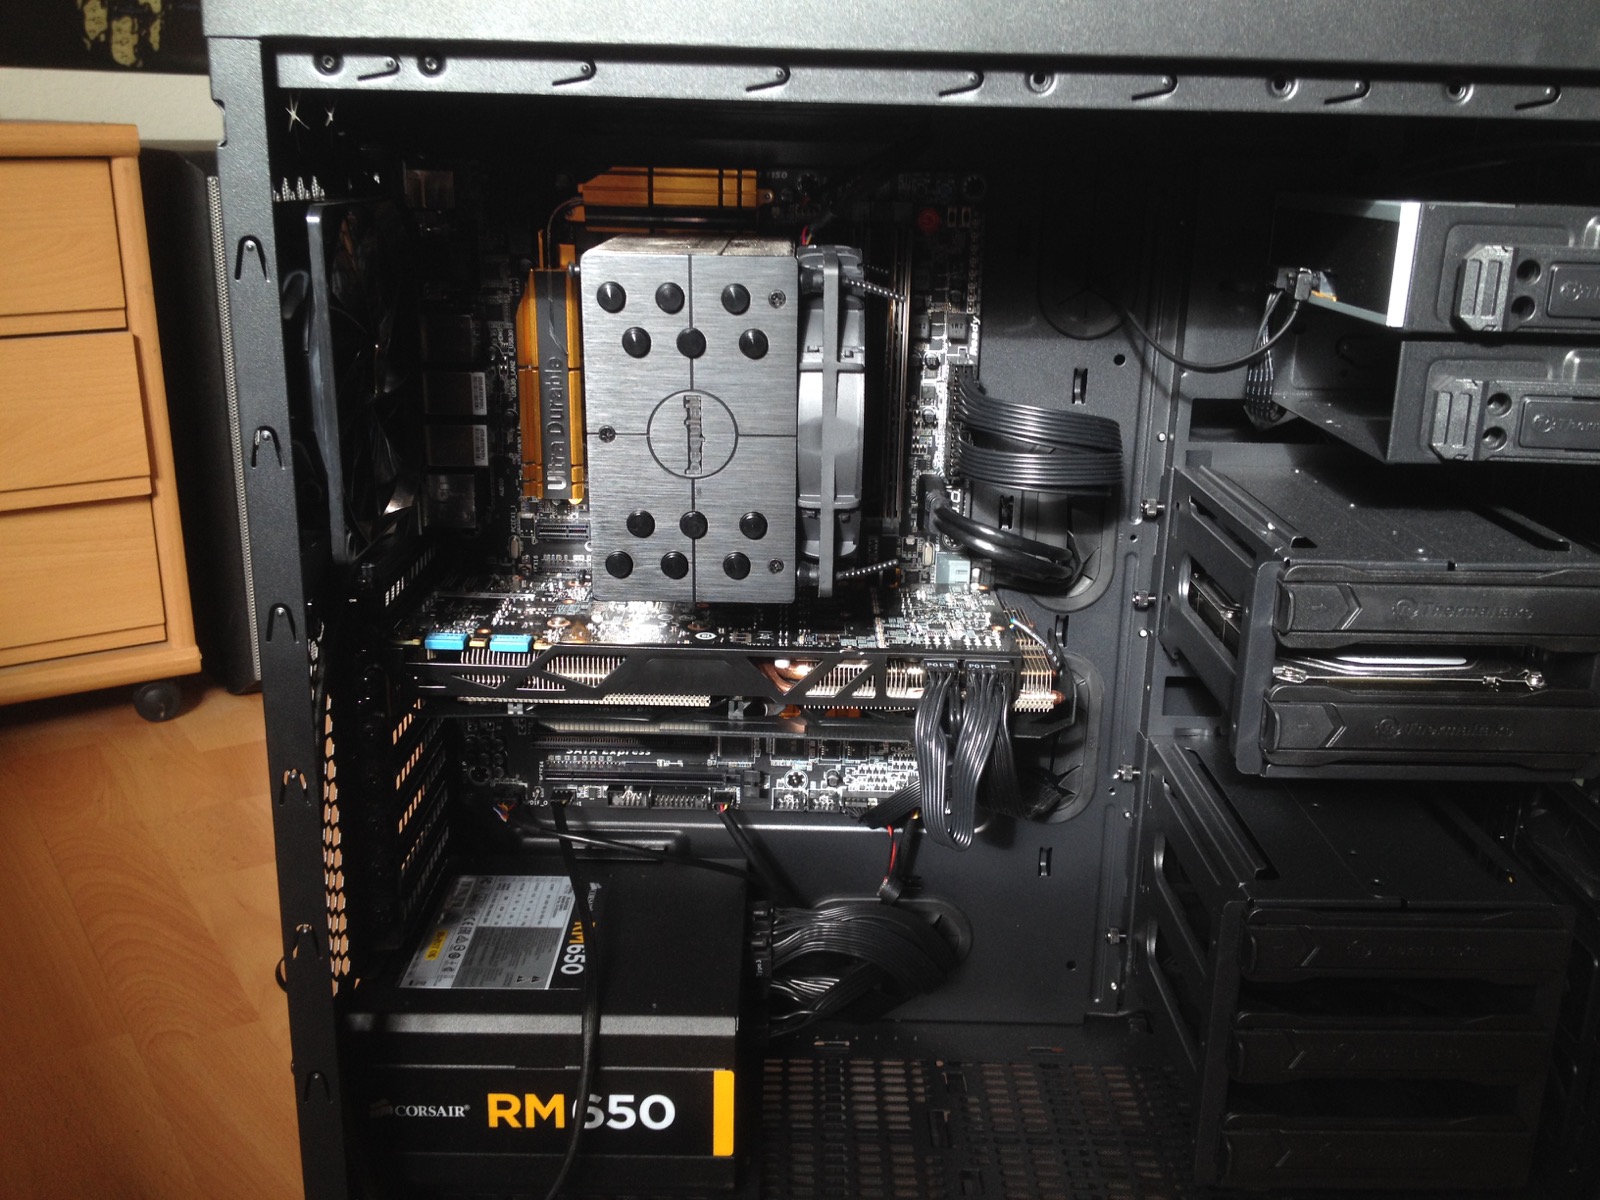
CPU temperature problems
Having no experience with recent desktop CPUs, I was under the impression that the boxed Intel CPU cooler should be enough to use the CPU without over clocking. Unfortunately, this turned out to be very wrong. Under 100% CPU load, the temperature quickly rose to 90+ degrees Celsius.
That's not a level I'm feeling comfortable at.
Unfortunately, there seem to be multiple different issues regarding this CPU generations temperature. Intel even released an official guide, Troubleshooting Intel Core i7-4790k/i5-4690k overheating.
Some early motherboard firmware revisions fed these CPUs too much core voltage, causing excessive heat. To be sure, I upgraded my motherboard to the latest firmware revision (F8 instead of F7 it came with), but this was not the case with both versions.
Additionally, many users are delidding their CPUs. That helps when there is not enough thermal compound between the CPU die and the heat spreader, or there are air gaps. But that's not a route I want to go with my new CPU (that still has warranty!).
So I was worried that I would have to RMA my CPU. But before sending it to Intel, I decided to try another cooler, the be quiet! listed at the top of this article. That solved my temperature problems, the CPU now stays under 70 degrees Celsius under full load.
It seems as if the boxed Intel coolers are not strong enough for their more powerful CPUs. I would not have thought that! The downside is, Gigabyte lists the maximum CPU cooler weight as 450 grams for this main board. The be quiet! I bought is quite a bit heavier than this. I hope this won't cause any long-term problems.
Disc drive spins up
One of the only problems that is not solved (yet): the Blu-Ray drive. Now don't get me wrong: Blu-Ray reading and burning is working as expected. But, as long as the Put hard disks to sleep when possible option is enabled in the System Preferences, the drive will spin up approximately every 10 minutes.
One way to solve this, while still putting hard disks to sleep, is to simply insert a blank CD. But that doesn't seem seem like a proper solution.
I even tried DeviceMergeNub, a four year old kernel extension that can spoof the drive identifications, making the OS think it is an original Apple drive. This works, and the drive is detected as Apple drive, but unfortunately it is still noisy.
It seems as if Mac OS X does this polling with all drives, regardless of manufacturer. The only difference is that some drives do spin up with every poll and others seem to "cache" the result, so they can answer subsequent polls without spinning up again.
Other drive manufacturers don't have this problem and some even released a new firmware fixing it. So choose your drive wisely!
Transition from Laptop to Desktop
Another thing I didn't even think about are my energy saving/sleep preferences. Before building this computer my only machine was a MacBook Pro 2010. Most of the time it was at my desk, running off the charger, and I used it (for example) to stream movies before going to sleep. That was no problem: the screen turned off and the fans were silent, but the machine stayed on the network.
Of course, that's not so easy with a desktop. When it's running the fans are quite noisy, and when it's sleeping it doesn't stay on the network to stream. Right now I'm still streaming from my laptop, but I have to think of a more desk-space-efficient solution...
Hibernation
Using pmset I've completely disabled hibernation, so the Hackintosh should only go to sleep. When it is sleeping, waking it up has never been a problem. Unfortunately, it still seems to enter hibernation and switch off completely sometimes. When this happenes, I can select the hibernation image in Clover, but after booting it the screen stays black and the machine stays offline (can not be reached via SSH).
It seems as if there currently are some issues with hibernation using a UEFI Clover. But I can live with that, as long as I can find a way to prevent the OS from hibernating in the first place.
Bluetooth
I still had an old Belkin Mini adapter. It works with the Apple Trackpad and Playstation 3 controllers, but it can't wake the Hackintosh from sleep. So I'm looking to replace it with the IOGEAR GBU521 adapter, that is reported to be able to wake Hackintoshes, even using the Trackpad (which seems to work with even less adapters than the Apple keyboard and mouse).
iCloud & iMessage
Getting iCloud to work should be no problem. Before logging in for the first time, make sure the BSD device identifiers for your network interfaces are ordered sequentially (meaning, if you have one NIC, it has to be called en0). If there are gaps in the naming scheme, delete the corresponding configuration file:
sudo rm -rf /Library/Preferences/SystemConfiguration/NetworkInterfaces.plist
Reboot, then open the Network PrefPanel and delete + recreate the offending device.
I'm not sure if you have to do one of these, or both. Just play around until it works :)
iMessage support seems to be another beast. To get it to work, you need valid serial numbers for your "Mac", as well as main board identifiers. There are many threads concerning this, some users report getting their iCloud Account blacklisted, and Apple seems to be in the middle of some changes regarding their authentication schemes. That's why I haven't yet tackled this topic. I guess in a month or so the situation will be different.
Update: Apple has reverted their authentication changes, so iMessage now seems to work fine out of the box.
Benchmarks
$ cd OpenRaider/build
$ make clean
$ time make -j8 all check
  ...
  34.87s user 3.03s system 575% cpu 6.590 total
Wow, 7 seconds! The same thing (-j4) on my 2.4GHz Core 2 Duo takes about 45 seconds:
69.05s user 9.54s system 160% cpu 48.906 total
The free version of GeekBench 3 (32bit only!) gives these results: 4124 Single-Core Score, 16032 Multi-Core Score.
Some GpuTest results (always 1600x900 windowed, 8x MSAA, 60 seconds):
FurMark: 1326 points (22 FPS)
TessMark X64: 4055 points (67 FPS)
GiMark: 2512 points (41 FPS)
PixMark JuliaFP64: 2156 points (35 FPS)
PixMark JuliaFP32: 19034 points (316 FPS)
PixMark Piano: 1053 points (17 FPS)
PixMark Volplosion: 2312 points (38 FPS)
Triangle: 40698 points (678 FPS)
Plot3D: 1311 points (21 FPS)
Fan Noise
After replacing the boxed Intel CPU cooler, the noise level already went down considerably. However, I'm still not quite happy. The CPU cooler fan in BIOS mode "Normal" seems to be about the same volume as the (included) case fans in "Silent" mode. This seems to be a pretty strong argument for these be quiet! fans for me, so I'm planning on replacing the fans with the be quiet! Silent Wings 2 PWM. My main board supports 3 PWM fans (4pin) and 1 non-PWM fan (3pin).
My case supports many different fan configurations. Up to 3x120mm in front, 2x200mm at the top, 1x140mm at the back and 2x120mm at the bottom. I'm not sure how to match these options optimally. I'm thinking about 2x140mm intake at the front, 1x140mm and 1x200mm outwards at the back and the top. But we'll see.
Also take a look at my PWM Fan mod.
Amazon.de affiliate links
I was looking to get the cheapest price for each part, so I researched on geizhals.de and bought everything on MindFactory.de and notebooksbilliger.de (no affiliation).

